こんばんは,@PKです.
CellProfilerのExample pipelineを使って画像解析を学ぶ第4回です.
前回はこちら.
t-kahi.hatenablog.com
今回は,オブジェクト同士の関係性を設定するモジュールや,2次オブジェクトの設定の部分を中心に最後まで紹介していきます.
下のオレンジの点線の部分が今日の内容です.


- RelateObjects
- IdentifySeondaryObjects
- IdentifyTertiaryObjects
- MeasureObjectIntensity
- MeasureObjectSizeShape
- OverlayOutlines
- SaveImages
- ExportToSpreadsheet
- 最後に…
RelateObjects
このモジュールは2つのオブジェクトの関係性を設定します.
親オブジェクト(例えば核)として設定した中に含まれるすべてのオブジェクトが子オブジェクト(核内の顆粒)になります.
以下の図のように,親となるオブジェクトの中に子オブジェクトが位置づけられているときに使用することができます.

子オブジェクトを親オブジェクトに関連付けることで,一つの親に対応する子オブジェクトの総和や,平均蛍光強度などを算出することができます.
また結果が出てきたときに,各子オブジェクトがどの親に属していたかもわかります.
(子オブジェクトは端が親に触れているだけでも子オブジェクトとして認識されます.)

設定する項目は以下の通りです.
Parent objects : 親オブジェクトを選択する
Child objects : 子オブジェクトを選択する
Name the output object : 関連付けてオブジェクトに名前を付ける
Calculate per-parent means for all child measurements? : 親ごとにすべての子オブジェクトの平均値を計算するか
Calculate child-parent distances? : 親と子の距離を計算するか
今回は親オブジェクトがNucleiで子オブジェクトがPH3と設定しています.また,(PH3が親ごとに複数あるわけではないので)親ごとの子オブジェクトの平均値や親と子の距離は算出していません.
モジュールを動かすと,下図のように「PH3 labeled by Nuclei」という新しいオブジェクトが作られたのがわかります.

IdentifySeondaryObjects
続いて,IdentifySeondaryObjectsについてです.
このモジュールは他のモジュールで認識されたオブジェクト(例えば核)を起点にして,他のオブジェクト(細胞)を認識するために使います.
細胞質染色だけで良いのでは?と思うかもしれませんが例えば以下の左図のように,細胞を染色しただけの場合は,密集したり一様に染色されていないと,どれがどの細胞なのかを判断することが難しくなります.
一方で核を先に認識させることで,その周囲を囲んでいるものを細胞を認識することが容易になります.細胞認識のときにIdentifySecondaryObjectsを用いるのはそのためにです.

さて,実際のモジュールの内容は以下の通りです.

- Select the input image : 2次オブジェクトの境界線を決めるための画像を選択する
- Select the input objects : 2次オブジェクトを決めるために1次オブジェクトを選択する
- Name the objects to be identified : 新しいオブジェクトの名前を入れる
- Select the method to identify the secondary objects : 接触している2次オブジェクトを認識する手法を選択する
- Propagation
- Watershed - Gradient
- Watershed - Image
- Distance - N
- Distance - B
それぞれの手法についてと,どれが良いのかは,まだ勉強不足なので上手く説明ができません…
PropagationはWatershed の改良版なので,DefaultはPropagationになっています.
Watershedに関しては,以下を参考にしてください.
物体セグメンテーションアルゴリズム"watershed"を詳しく - Qiita
Distanceは,1次オブジェクトのエッジを拡大して2次オブジェクトを作るときに使います.
自分も良くやるのですが,細胞の形がある程度丸い場合は,核の形を一定の幅拡大してPseud cellとして扱うことができます.
Distance - Nは,2次染色画像を全く使わず,1次オブジェクトだけで拡大をします.
Distance - Bは,2次染色画像を「バックグラウンドの除去」のために使用します.バックを除くことでより正確に2次オブジェクトを定義することができます.
これより下の設定は,IdentifyPrimaryObjectsのAdvanced settingでも登場したので,前回の記事を参考にしましょう.
【CellProfiler】Example pipelineで画像解析の基礎を学ぶ③ - t_kahi’s blog
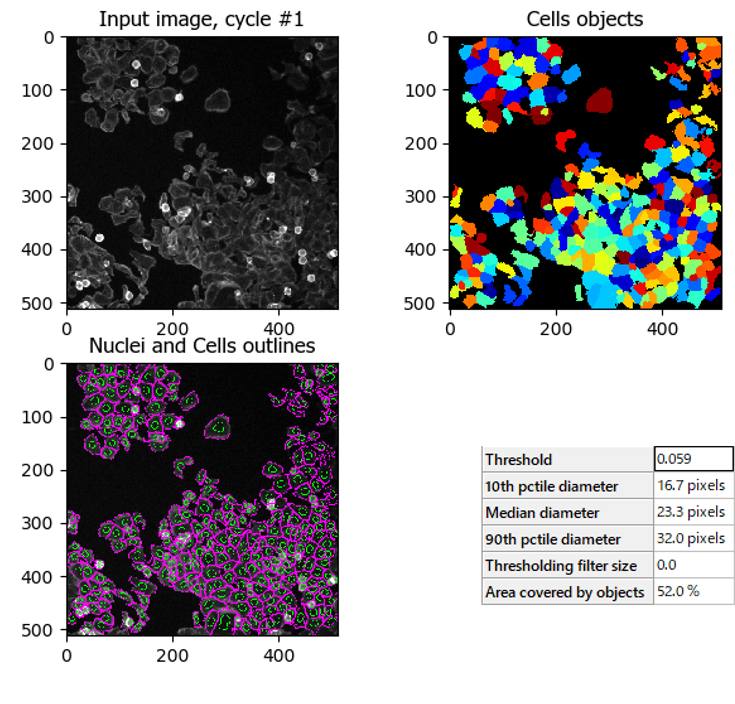
モジュールを動かすと,下図のように「Cell Objects」という新しいオブジェクトが作られたのがわかります.
核を認識してその周囲を取り囲む細胞を認識できています.

IdentifyTertiaryObjects
つづいて,3次オブジェクトの認識についてですが,簡単なのでサクッと行きます.
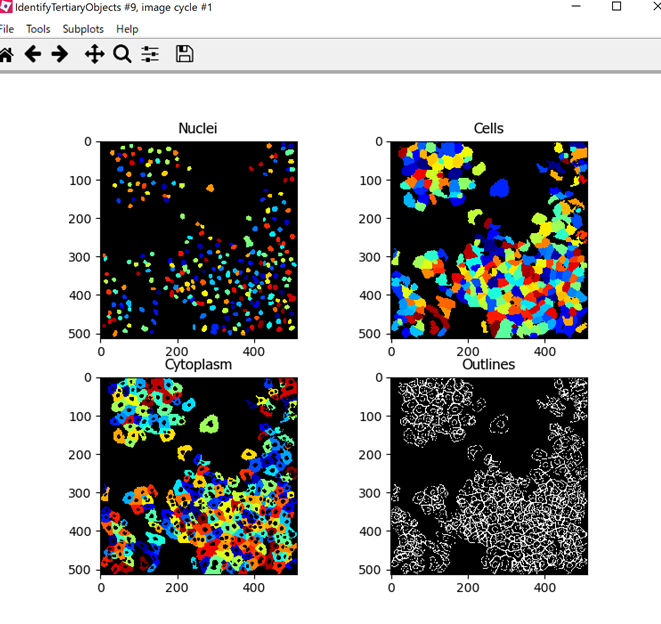
先ほど設定した2次オブジェクト「細胞」をもとにして,そこから1次オブジェクト「核」を除いた「細胞質」の領域を設定するときに3次オブジェクトを使います.

モジュールの設定は以下の通りです.

計算対象の1次,2次オブジェクトをそれぞれ設定して,3次オブジェクトの名前を付けるだけです.
「Shrink smaller object prior to subtraction? 」に関しては,Defaultで「Yes」が選択されています.これは,1次オブジェクトを2次オブジェクトから除く前に「1ピクセル」だけ1次オブジェクトを減算しています.これによって3次オブジェクトが常に生成されるようになります.
モジュールを動かすと,下図のように「Cytoplasm」という新しいオブジェクトが作られたのがわかります.

MeasureObjectIntensity
各オブジェクト内の強度値を測定してくれるオブジェクトです.

上図の例では,「Nuclei」,「Cell」,「Cytoplasm」それぞれのモジュールで,「DNA」と「PH3」の蛍光強度を測定する設定になっています.
ちなみに,測定するパラメータは以下の通りです(そのまま持ってCellProfilerのサイトから持ってきました.)
- IntegratedIntensity: The sum of the pixel intensities within an object.
- MeanIntensity: The average pixel intensity within an object.
- StdIntensity: The standard deviation of the pixel intensities within an object.
- MaxIntensity: The maximal pixel intensity within an object.
- MinIntensity: The minimal pixel intensity within an object.
- IntegratedIntensityEdge: The sum of the edge pixel intensities of an object.
- MeanIntensityEdge: The average edge pixel intensity of an object.
- StdIntensityEdge: The standard deviation of the edge pixel intensities of an object.
- MaxIntensityEdge: The maximal edge pixel intensity of an object.
- MinIntensityEdge: The minimal edge pixel intensity of an object.
- MassDisplacement: The distance between the centers of gravity in the gray-level representation of the object and the binary representation of the object.
- LowerQuartileIntensity: The intensity value of the pixel for which 25% of the pixels in the object have lower values.
- MedianIntensity: The median intensity value within the object.
- MADIntensity: The median absolute deviation (MAD) value of the intensities within the object. The MAD is defined as the median(|xi - median(x)|).
- UpperQuartileIntensity: The intensity value of the pixel for which 75% of the pixels in the object have lower values.
- Location_CenterMassIntensity_X, Location_CenterMassIntensity_Y: The (X,Y) coordinates of the intensity weighted centroid (= center of mass = first moment) of all pixels within the object.
- Location_MaxIntensity_X, Location_MaxIntensity_Y: The (X,Y) coordinates of the pixel with the maximum intensity within the object.
MeasureObjectSizeShape
こちらは各オブジェクトのサイズや形を測定するモジュールです.

こちらも,測定したいオブジェクトを選択するだけです. 今回は,「Nuclei」と「Cells」と「Cytoplasm」を選択しています.
測定するパラメータと概要は以下の通りです.(こちらもCellProfilerのサイトから持ってきました)
- Area: (2D only) The number of pixels in the region.
- Volume: (3D only) The number of voxels in the region.
- Perimeter: (2D only) The total number of pixels around the boundary of each region in the image.
- SurfaceArea: *(3D only)# The total number of voxels around the boundary of each region in the image.
System Message: WARNING/2 (
, line 47); backlink Inline emphasis start-string without end-string. - FormFactor: (2D only) Calculated as 4πArea/Perimeter2. Equals 1 for a perfectly circular object.
- Solidity: (2D only) The proportion of the pixels in the convex hull that are also in the object, i.e., ObjectArea/ConvexHullArea.
- Extent: The proportion of the pixels (2D) or voxels (3D) in the bounding box that are also in the region. Computed as the area/volume of the object divided by the area/volume of the bounding box.
- EulerNumber: (2D only) The number of objects in the region minus the number of holes in those objects, assuming 8-connectivity.
Center_X, Center_Y, Center_Z: The x-, y-, and (for 3D objects) z- coordinates of the point farthest away from any object edge (the centroid). Note that this is not the same as the Location-X and -Y measurements produced by the Identify or Watershed modules or the Location-Z measurement produced by the Watershed module.
Eccentricity: (2D only) The eccentricity of the ellipse that has the same second-moments as the region. The eccentricity is the ratio of the distance between the foci of the ellipse and its major axis length. The value is between 0 and 1. (0 and 1 are degenerate cases; an ellipse whose eccentricity is 0 is actually a circle, while an ellipse whose eccentricity is 1 is a line segment.)
- MajorAxisLength: (2D only) The length (in pixels) of the major axis of the ellipse that has the same normalized second central moments as the region.
- MinorAxisLength: (2D only) The length (in pixels) of the minor axis of the ellipse that has the same normalized second central moments as the region.
- Orientation: (2D only) The angle (in degrees ranging from -90 to 90 degrees) between the x-axis and the major axis of the ellipse that has the same second-moments as the region.
- Compactness: (2D only) The mean squared distance of the object’s pixels from the centroid divided by the area. A filled circle will have a compactness of 1, with irregular objects or objects with holes having a value greater than 1.
- MaximumRadius: (2D only) The maximum distance of any pixel in the object to the closest pixel outside of the object. For skinny objects, this is 1/2 of the maximum width of the object.
- MedianRadius: (2D only) The median distance of any pixel in the object to the closest pixel outside of the object.
- MeanRadius: (2D only) The mean distance of any pixel in the object to the closest pixel outside of the object.
- MinFeretDiameter, MaxFeretDiameter: (2D only) The Feret diameter is the distance between two parallel lines tangent on either side of the object (imagine taking a caliper and measuring the object at various angles). The minimum and maximum Feret diameters are the smallest and largest possible diameters, rotating the calipers along all possible angles.
- Zernike shape features: (2D only) These metrics of shape describe a binary object (or more precisely, a patch with background and an object in the center) in a basis of Zernike polynomials, using the coefficients as features (Boland et al., 1998). Currently, Zernike polynomials from order 0 to order 9 are calculated, giving in total 30 measurements. While there is no limit to the order which can be calculated (and indeed you could add more by adjusting the code), the higher order polynomials carry less information.
OverlayOutlines
このモジュールでは,それぞれの画像からどのようにオブジェクトを認識したのかを画像に重ねて示すことができます.

基となる画像を選択し,そこにどのようなオブジェクトを何色で重ねて示すかを選択するだけです.
モジュールを動かすと,以下のようになります.

SaveImages
画像を保存できるモジュールです(説明は必要ないと思うので省きます).

ここでは先ほどOverlayOutlinesで作成した画像をpng形式で保存しています.
ExportToSpreadsheet
測定した特徴量を出力することができるモジュールです(説明は省きます).
今回はCSV形式で出力をしてみましたが,各オブジェクトごとに特徴量が出力されていることがわかります.

最後に…
自分の勉強がてら,Example Pipelineの中から一番簡単だと思われるHuman cellを題材にして,それぞれのパイプラインでどんなことをしているのかを簡単ではありますが紹介してみました.
一つ一つ紹介しようと思うと思っていたより大変だったことに書き始めは気づきませんでしたね…
次からは,CellProfilerを使う上で各要所で重要かと思う点について紹介していければと思います.
自分自身が勉強中ですが,使いこなせれば非常に強力なツールだと感じました.引き続き学んでいきます.